How to Draw a Floor Plan Yourself
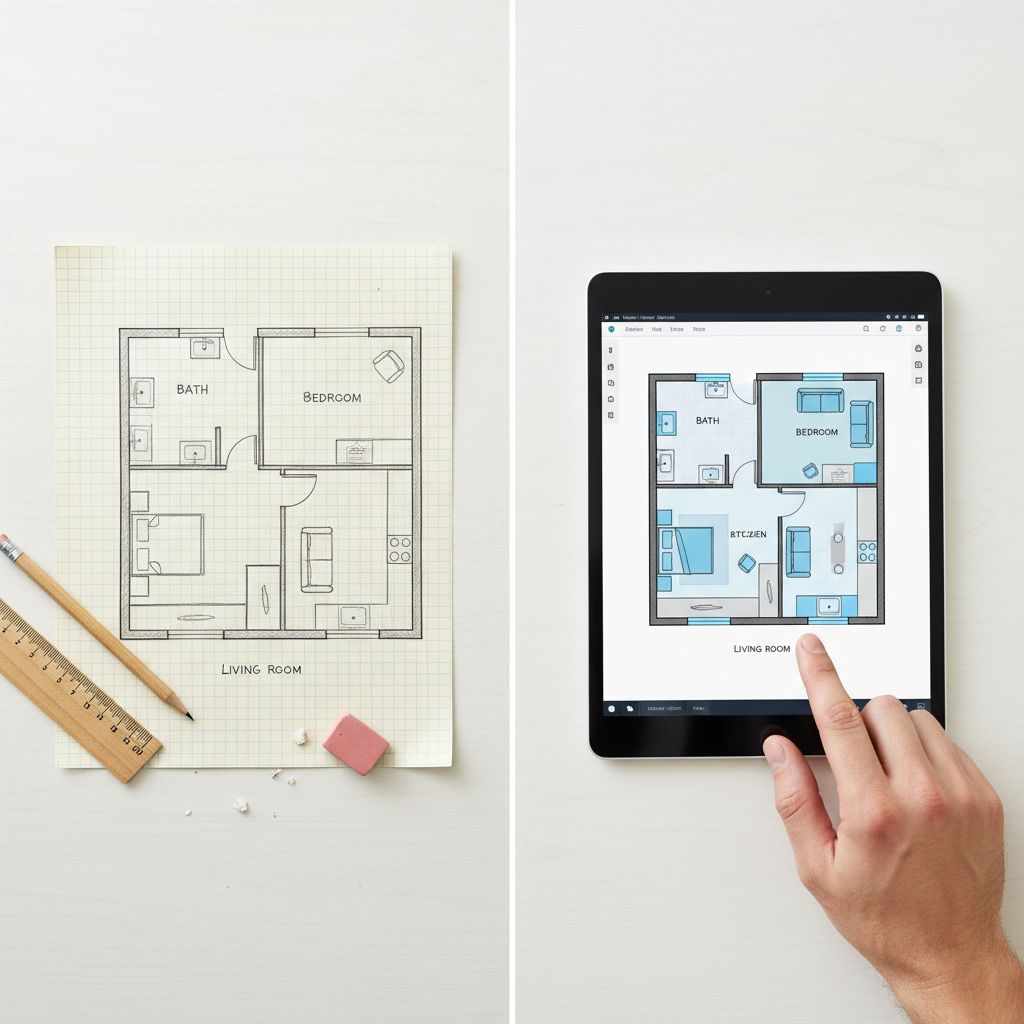
Split image showing a hand-drawn floor plan on graph paper alongside a digital floor plan on a tablet screen, demonstrating both traditional and modern methods
Whether you're renovating, selling property, or planning a new layout, knowing how to create a floor plan yourself is an invaluable skill in 2026. According to the National Association of Realtors, floor plans rank as the third most important element in property listings—and for good reason. Research shows floor plans increase buyer click-through rates by 52%, while a Rightmove study reveals four out of five homeowners skip listings without them entirely.
Technology has transformed what once required professional expertise. Today, smartphone apps can generate basic floor plans in just 10 minutes. However, understanding traditional hand-drawing methods remains valuable, giving you complete control over your designs and deeper spatial awareness. Floor plans also serve as a universal language for construction teams, ensuring everyone works from the same blueprint.
This guide covers both approaches—from sketching on graph paper to using digital solutions like Interior Design 3D, a beginner-friendly tool that simplifies the entire process. Whether you prefer pencil and ruler or touchscreen precision, you'll learn the techniques needed to create accurate, professional-looking floor plans that serve your specific needs.
Quick Answer: How to Draw a Floor Plan in 6 Steps

Creating a floor plan doesn't have to be complicated. Whether you're redesigning your space or planning a renovation in 2026, these six steps will guide you from blank page to finished plan.
Step 1:
Gather your measuring tools and drawing supplies—a tape measure, graph paper, and pencil work perfectly, or choose floor plan software.
Step 2:
Measure all room dimensions and fixed features carefully, recording everything as you go.
Step 3:
Select your scale. The standard 1/4 inch = 1 foot works for most residential projects.
Step 4:
Draw your walls, starting with exterior boundaries before adding interior divisions.
Step 5:
Add doors, windows, and built-in features like closets and fireplaces.
Step 6:
Include furniture placement and verify all measurements for accuracy.
With these fundamentals covered, you're ready to dive into the detailed techniques below that'll help you create professional-quality floor plans.
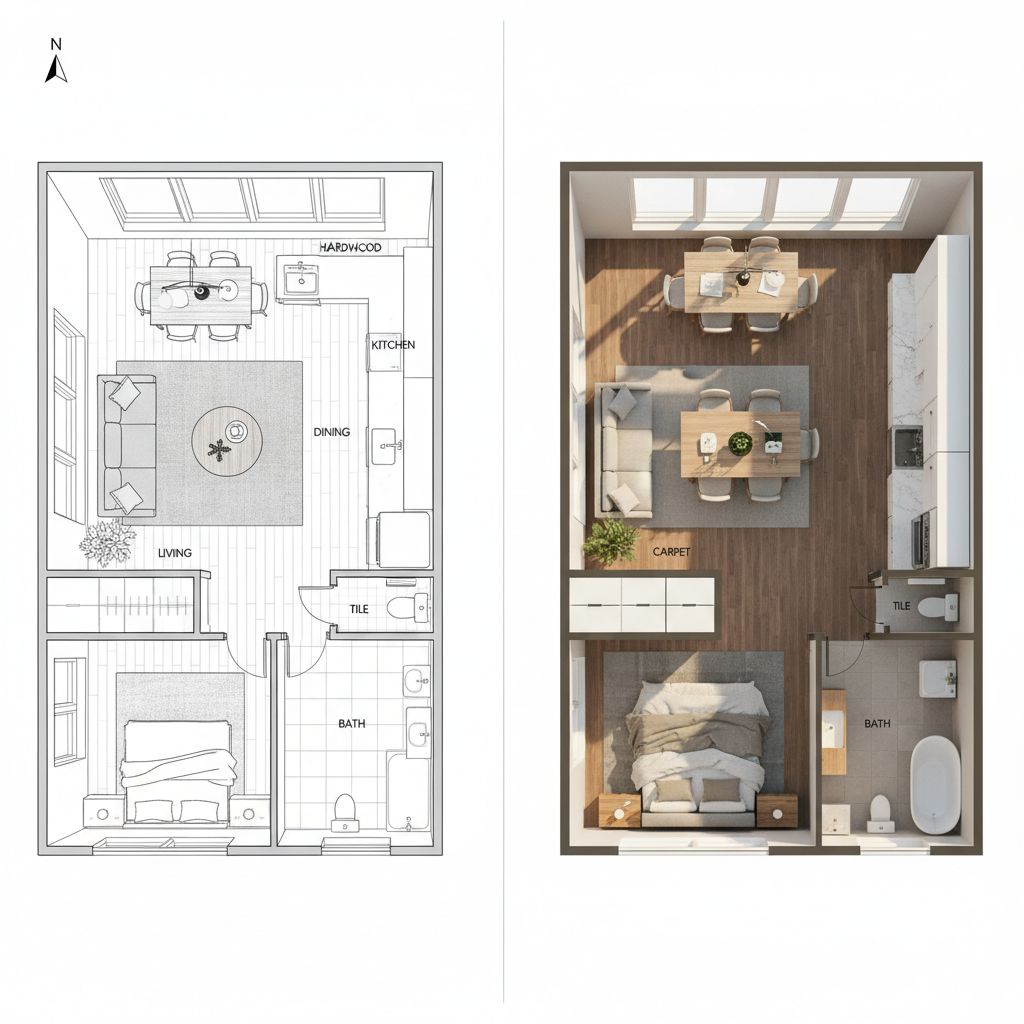
What is a Floor Plan?
A floor plan is a scaled technical drawing that shows a building's layout from above. Think of it as a bird's-eye view that reveals how rooms, spaces, and physical features connect on each level. Whether you're renovating your home or building from scratch, understanding floor plans helps you visualize the final structure before construction begins.
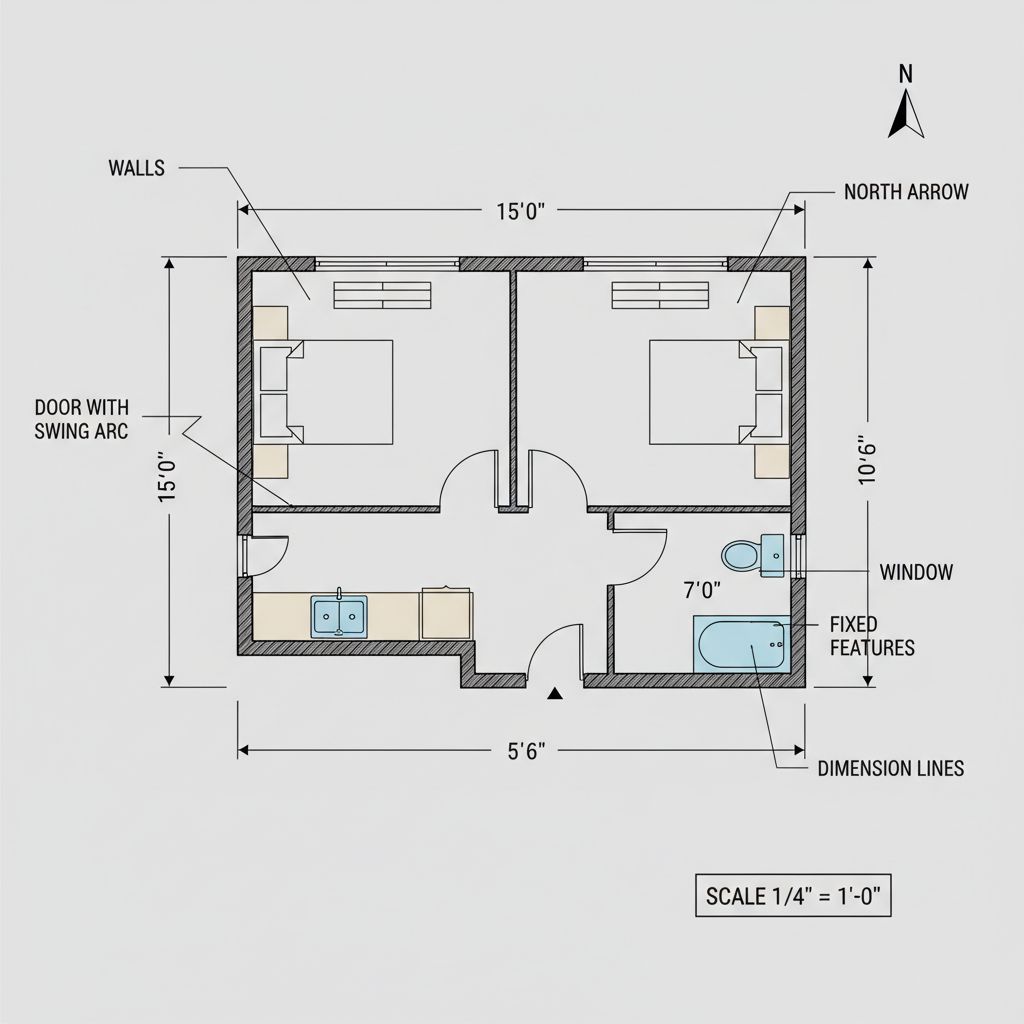
Annotated floor plan diagram with labels pointing to each element: walls, doors with swing arcs, windows, fixed features, dimension lines, scale notation, and north arrow
Floor plans serve as blueprints that help architects, designers, and homeowners communicate ideas clearly. In 2026, these drawings remain essential despite advances in 3D modeling technology.
Every floor plan contains specific elements you should recognize. Walls appear as thick parallel lines marking room boundaries. Doors use symbols showing placement and swing direction, with an arc indicating how the door opens.
Windows show as thin rectangles within walls, indicating opening locations throughout the structure. Fixed features like sinks, cabinets, and appliances appear as standardized symbols in their installed positions.
Dimensions provide measurements between walls and room sizes, giving you actual spatial information. Scale information serves as your reference for understanding how drawn measurements translate to real-world sizes.
Directional markers, typically north arrows, help with orientation and understanding how the building sits on its lot.
These standard symbols and measurements create a universal language that eliminates communication barriers between professionals and clients. Once you learn to read these elements, you can interpret any floor plan regardless of who created it.
Tools You Need to Draw a Floor Plan
Before you start sketching, gather your essentials. For manual drafting, you'll need graph paper, a ruler, pencil, and eraser.
Going digital in 2026? Software like AutoCAD, SketchUp, or free apps like Floorplanner give you professional results without the learning curve.
Essential Measuring Tools

Accurate floor plans start with the right measuring equipment. Whether you're documenting a single room or an entire property, having reliable tools ensures precision every time.
Your toolkit should include both traditional and modern options. A standard 25-foot tape measure handles basic room dimensions, while a laser distance measurer like the Bosch GLM 50 delivers 1/4 inch accuracy at the push of a button.
Laser measurers excel at capturing room sizes, wall lengths, and ceiling heights in seconds—saving you significant time on every project.
Essential measuring tools you'll need:
– Standard 25-foot tape measure for basic dimensions
– Laser distance measurer (e.g., Bosch GLM 50) for 1/4 inch accuracy
– Scale ruler for converting measurements to paper
– Compass for marking curved elements
– Protractor for measuring angles
Combining these tools gives you everything needed to capture any space accurately in 2026.
Drawing Supplies
Before you dive into digital tools, traditional hand-drawing remains a reliable method for creating floor plans. Starting with the right supplies ensures your measurements translate accurately onto paper.
Graph paper forms your foundation—those grid lines help you maintain consistent scale and keep everything properly aligned.
For line work, grab mechanical pencils with 0.5mm or 0.7mm lead tips, which give you optimal control for precise details.
An architectural scale ruler is essential for converting your ground measurements to paper accurately. These rulers feature multiple ratio options, including common scales like 1/4 inch equals one foot.
Round out your toolkit with a quality eraser for clean corrections, a straight edge or T-square for perfectly accurate lines, and optionally, drafting templates for standard door and window symbols.
Digital Alternatives and Software
Digital tools have completely transformed how you create floor plans in 2026. Whether you're a beginner or seasoned professional, there's software designed for your specific needs and skill level.
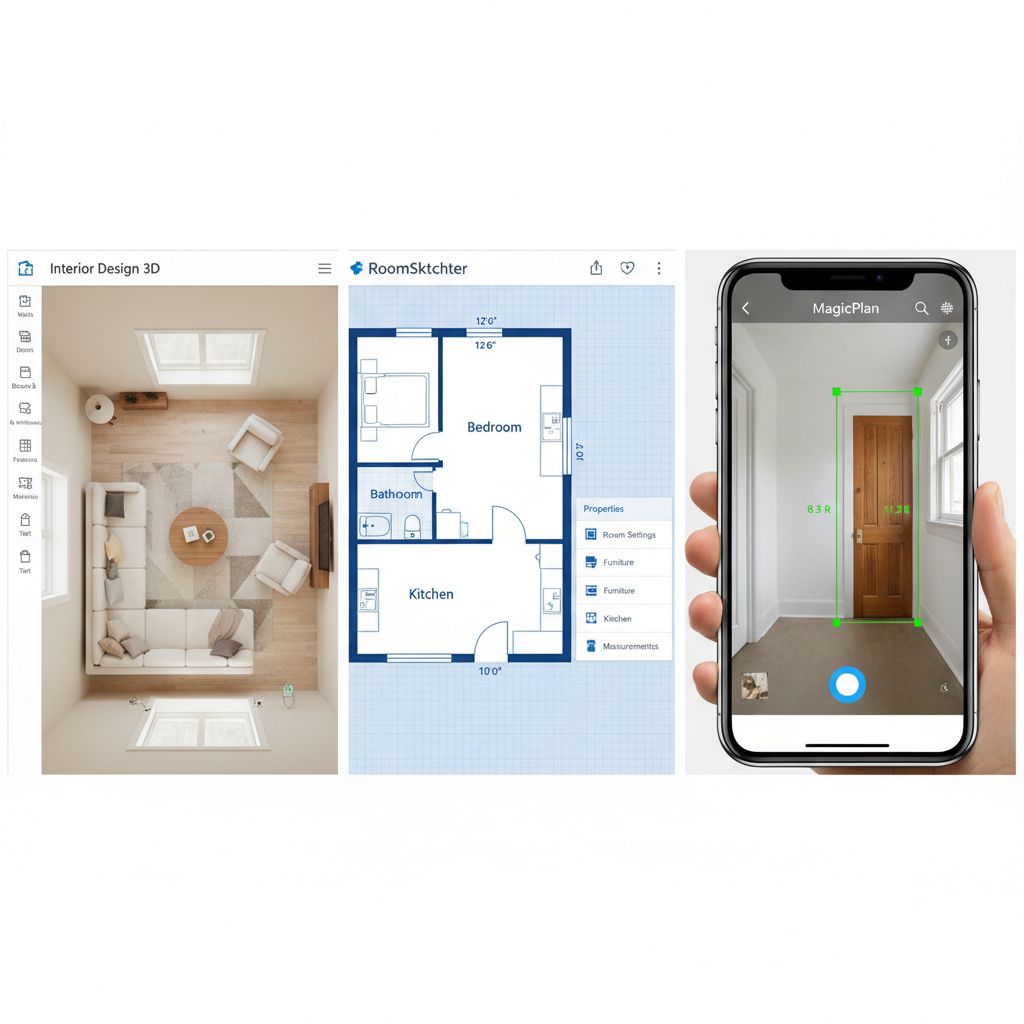
Interior Design 3D stands out with its user-friendly drag-and-drop functionality, making it accessible for newcomers while offering powerful features professionals appreciate.
For detailed 2D and 3D representations, AutoCAD and SketchUp remain industry standards among architects and designers.
RoomSketcher serves real estate professionals perfectly, while Planner 5D offers versatile 2D and 3D modeling capabilities. Microsoft Visio provides professional templates with CAD export functionality.
Mobile applications have made on-site work seamless. MagicPlan lets you measure rooms using just your smartphone camera—no extra equipment needed.
The AutoCAD mobile app bridges the gap between fieldwork and office designs, keeping your projects synchronized.
Cloud-based programs now allow multiple users to collaborate on the same design simultaneously, enabling real-time teamwork regardless of location.
These digital solutions save you time, reduce errors, and offer flexibility that traditional methods simply cannot match.
Setting Up Your Drawing Space
Before you start sketching in 2026, take a moment to prepare your workspace properly. Gather your preferred materials and ensure you have good lighting and a comfortable, clutter-free area to work in.
Choosing the Right Paper Size
Selecting the right paper size for your floor plan depends on several factors you'll need to balance: project complexity, detail requirements, viewing distance, and printing costs. Getting this decision right from the start saves you time and frustration later.
For global architectural drawings, the A series (A1, A2, A3, A4) remains the international standard in 2026. American construction documents typically use the ARCH series instead.
When working on detailed plans like electrical or structural layouts, opt for A1 or A0 sizes to capture every element clearly.
For smaller projects such as single room layouts, A3 or A2 provides sufficient space without unnecessary bulk.
Standard 8×10.5 inch graph paper offers a practical option for residential projects. With 41 squares along the long side and 31 on the short side, it comfortably fits rooms under 40 feet by 30 feet when each square represents one square foot.
Understanding Scale Measurements
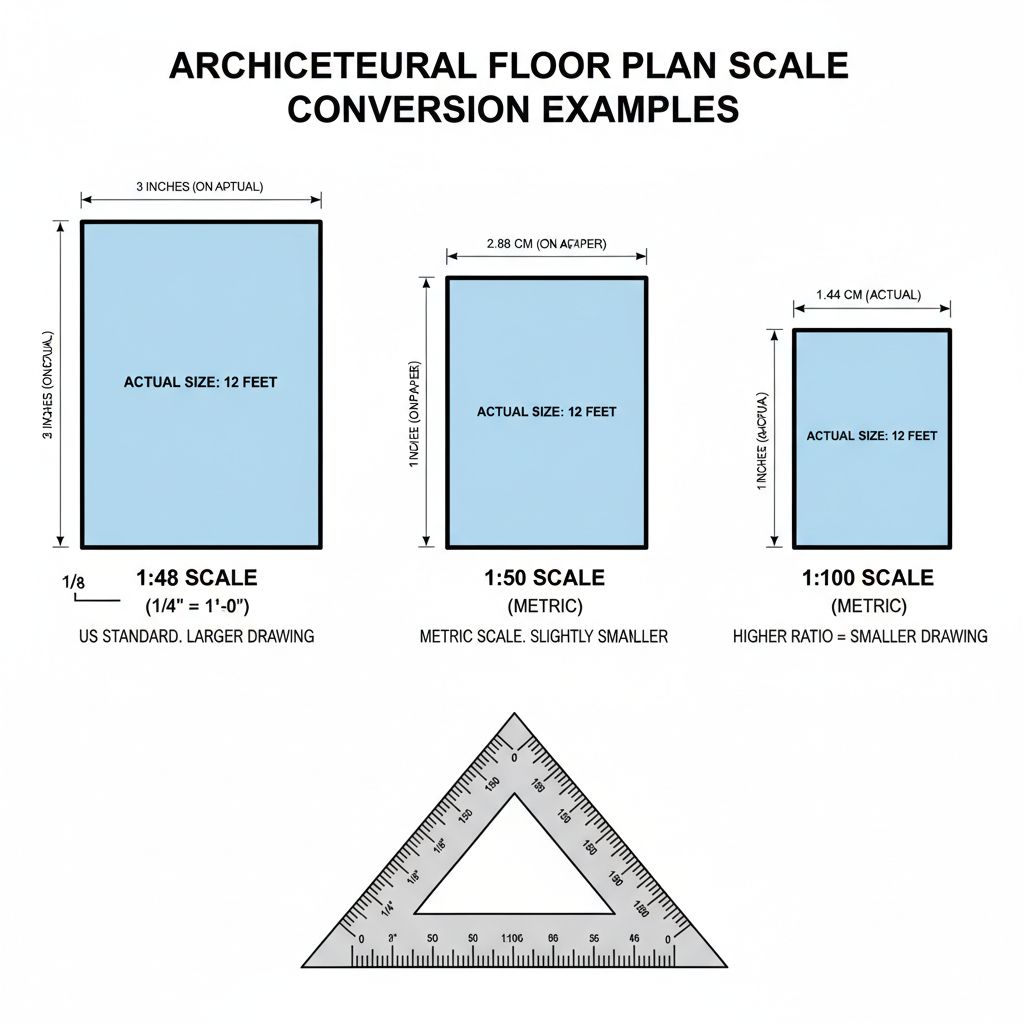
Floor plans shrink massive buildings onto manageable paper sizes through precise mathematical ratios. Understanding these conversions helps you accurately visualize actual room dimensions from any blueprint you encounter.
In the US, 1/4 inch equals 1 foot (1:48) remains the standard architectural scale for residential projects. This ratio offers the perfect balance between detail and paper efficiency.
Metric systems typically use 1:50 or 1:100 scales, where squares represent 25 centimeters—meaning every 4 squares equal 1 meter.
Site plans require larger ratios like 1:200 or 1:500 to capture entire properties. At 1:200 scale, 1 centimeter on paper represents 2 meters in reality.
Your paper size and project scope determine which scale works best. Larger buildings need smaller ratios to fit standard sheets.
Architectural scale rulers feature different scales on each edge, allowing quick translation between paper measurements and actual dimensions. Simply align the appropriate edge with your blueprint and read real-world measurements directly.
Mastering these conversions transforms confusing numbers into spatial understanding, making your floor plan reading far more intuitive.
Measuring Your Space Accurately
Accurate measurements form the foundation of any successful floor plan in 2026. Before you start designing, grab a laser measure or traditional tape and document every wall, doorway, and architectural feature in your space.
Room-by-Room Measurement Process
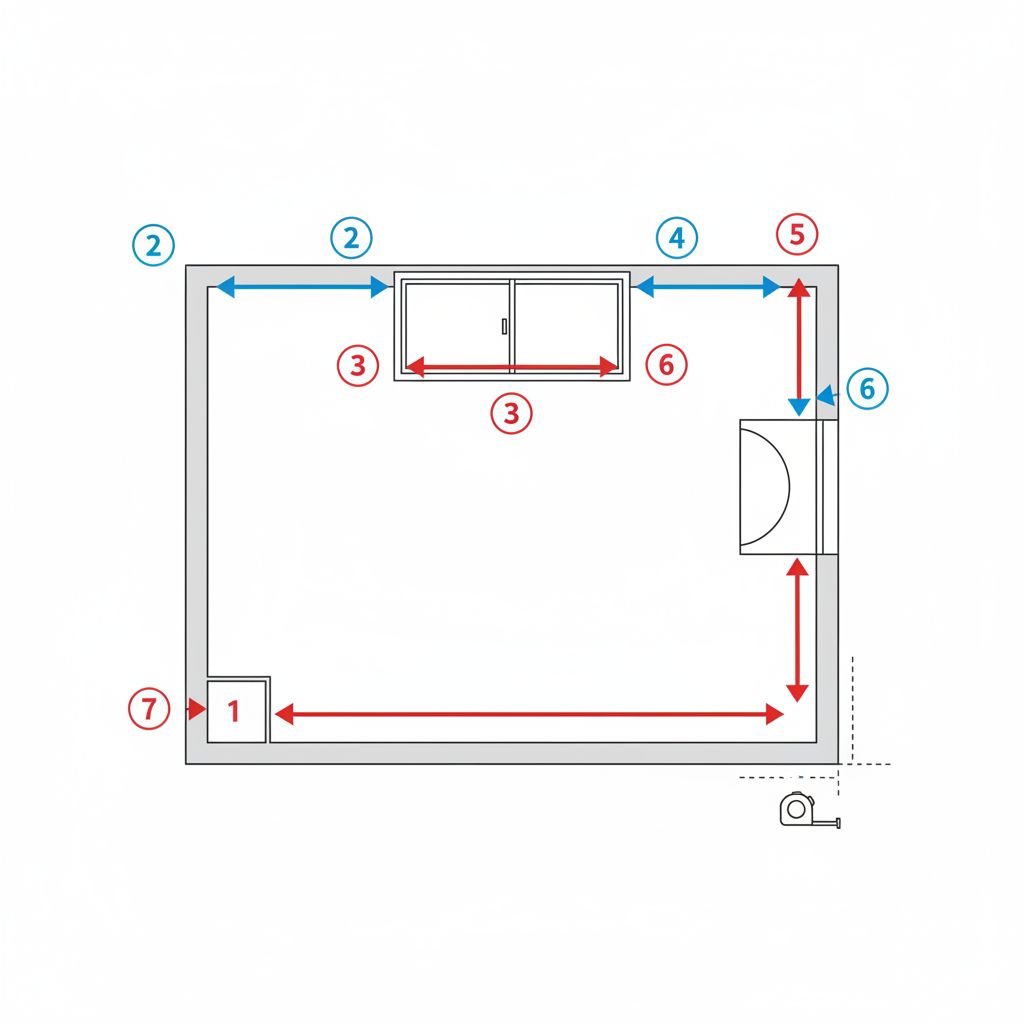
Start with your exterior walls to build a solid foundation before tackling interior measurements. Run your tape measure along the baseboard from corner to corner on the longest wall first—this gives you complete wall-to-wall dimensions to anchor all other measurements.
Follow this step-by-step sequence for accurate results: 1) Record overall room dimensions, 2) Measure from the corner to your first opening, 3) Document window and door widths, 4) Note distances between openings, 5) Mark built-in features and fixtures, 6) Calculate wall thickness.
Having a partner makes this process significantly faster and more accurate—one person holds the tape measure steady while the other records the numbers.
Don't skip calculating wall thickness, as this detail becomes essential when you're planning furniture placement or renovation work.
Work methodically around the room, moving clockwise to avoid missing any features.
Double-check measurements for windows and doors since these dimensions directly impact material orders and installation costs.
Recording Measurements Accurately
Accurate documentation transforms raw measurements into reliable construction data. Round your measurements to the nearest 1/4 inch for preliminary plans, but switch to 1/16 inch precision for detailed projects requiring exact specifications.
Simplify your calculations by recording everything in inches only—write 126.50" instead of 10' 6-1/2". This eliminates conversion errors and speeds up your workflow significantly.
Organize your documentation room-by-room using a dedicated notebook or digital app. Note electrical switches, outlets, and HVAC locations as you go.
Verify your accuracy by comparing exterior and interior dimensions, checking wall thickness calculations, and confirming parallel walls align correctly.
For complex areas, use the triangulation method—break spaces into smaller, manageable sections you can measure independently.
When tackling irregular shapes or curved walls, a flexible measuring tape captures exact outlines that rigid tools simply cannot match.
Cross-reference all opening measurements before finalizing your documentation. These verification steps catch errors early, saving you costly corrections during your actual project execution.
Drawing the Basic Layout
Now it's time to put pencil to paper. Start by sketching your wall framework first—this creates the foundation for everything else in your floor plan.
Starting with Exterior Walls
Exterior walls form the foundation of any floor plan you'll create. In 2026, standard exterior wall thickness remains 6 inches to accommodate framing, insulation, and finishing materials. Start your outline at the bottom of your drawing space, leaving enough room for possible extensions or projections.
Draw parallel lines representing wall thickness and mark corner points for reference.
Add wall dimensions outside the plan outline to keep the interior clean and readable.
Indicate construction materials where needed and leave space for additional details.
Use thick black outlines for exterior walls to make them visually prominent against interior elements. This simple distinction helps anyone reading your plan immediately understand the building's footprint and structural boundaries.
Adding Interior Walls
Interior walls, or partitions, typically measure 4.5 inches thick. This standard dimension comes from 2×4 studs with half-inch gypsum board applied to each side. When drawing these walls, you'll need to distinguish between load-bearing and partition types.
Load-bearing walls require proper anchoring to ceiling joists and floor structures, so always verify structural requirements before placement.
Partition walls simply divide spaces without carrying structural loads, giving you flexibility in room arrangements.
Some walls need extra thickness to accommodate plumbing runs or enhanced soundproofing between rooms.
Use thinner lines for interior walls compared to exterior walls—this creates clear visual hierarchy in your floor plans and helps viewers instantly distinguish between structural and non-structural elements.
Marking Doors and Windows
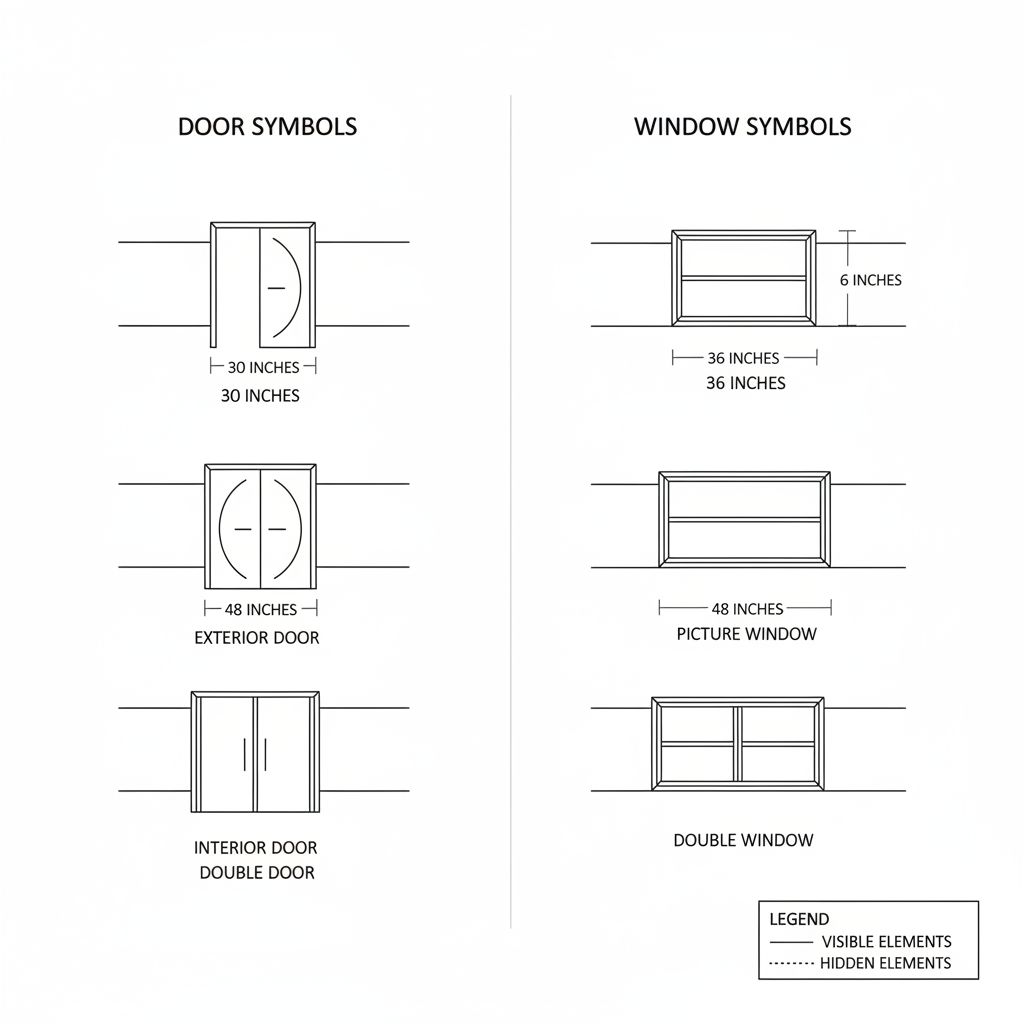
Doors and windows create breaks in your wall lines, and understanding their standard dimensions helps you read any floor plan accurately. Interior doors typically measure 28-30 inches wide, while exterior doors range from 32-36 inches to accommodate larger traffic flow.
When you see a door on a floor plan, look for the arc that indicates swing direction. Interior doors should swing inward toward rooms and away from hallways to prevent traffic collisions.
Windows appear as thin rectangles positioned within wall lines. Each window marking requires precise placement measurements, opening size specifications, and frame thickness indicators.
Wall thickness matters significantly for both elements. Exterior walls need adequate depth to properly house window frames and door jambs.
Use this visual guide: solid lines represent visible elements you can see, while dotted lines indicate hidden features behind surfaces. Mastering these symbols ensures you can interpret door and window placements with confidence.
Adding Fixed Features and Room Details
Complete your floor plan by adding permanent fixtures like built-in closets, fireplaces, and kitchen islands. Include room-specific elements such as electrical outlets and plumbing locations to ensure your 2026 design captures every essential detail.
Including Built-In Features
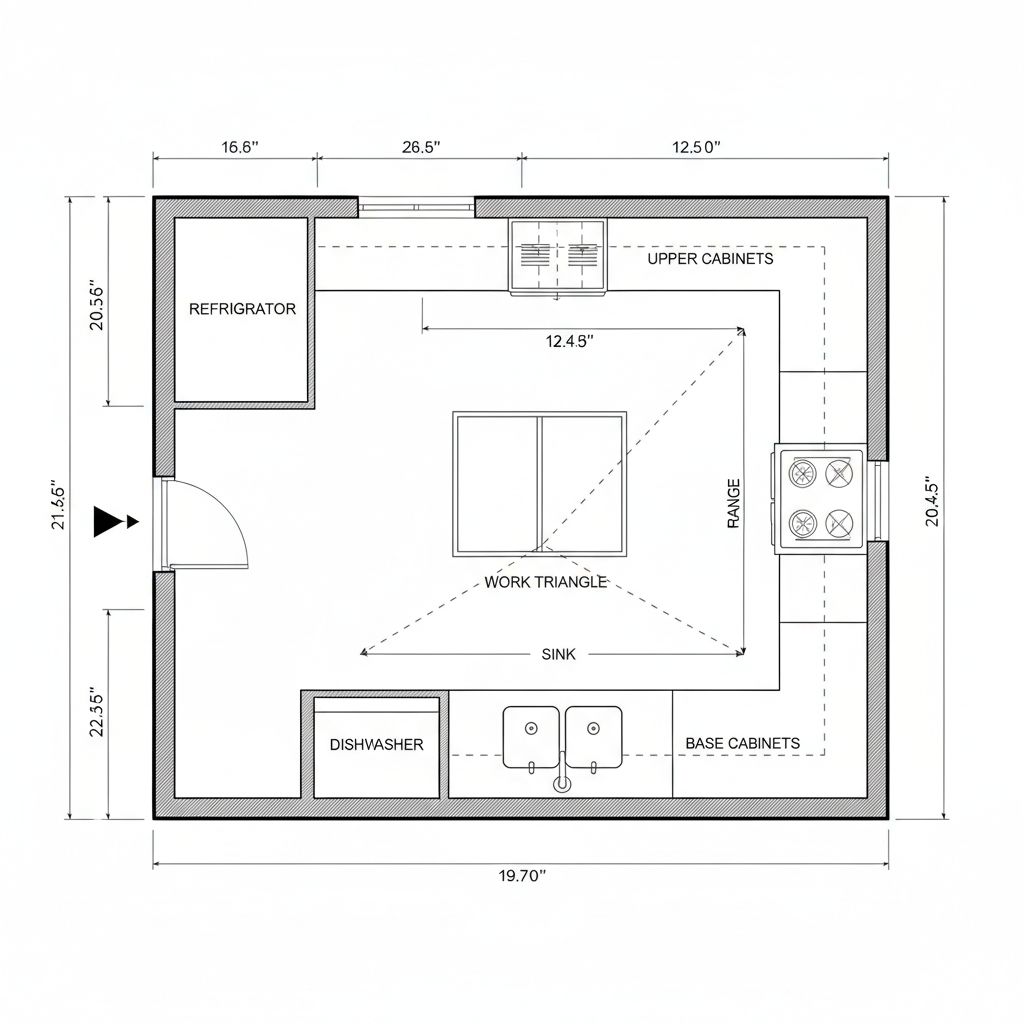
Built-in elements transform your floor plans from simple layouts into functional living spaces. When designing kitchens in 2026, you'll want to represent upper cabinets with dotted lines and base cabinets with solid lines—this distinction helps visualize storage capacity and workflow at a glance.
For bathroom layouts, position bathtubs under windows to maximize natural light, and place vanities where mirrors can capture daylight.
Your closet designs should clearly show door swing directions—whether sliding or traditional—along with built-in organization systems for optimal storage planning.
Mudrooms require dedicated zones for coats, shoes, and seasonal gear, so map these areas precisely.
When placing appliances, follow the work triangle principle: refrigerator, range, and dishwasher should form an efficient path for cooking and cleaning tasks.
Don't forget exact measurements for built-in bookcases, entertainment centers, and architectural niches—these details ensure your designs translate seamlessly from paper to reality.
Furniture Placement Guidelines
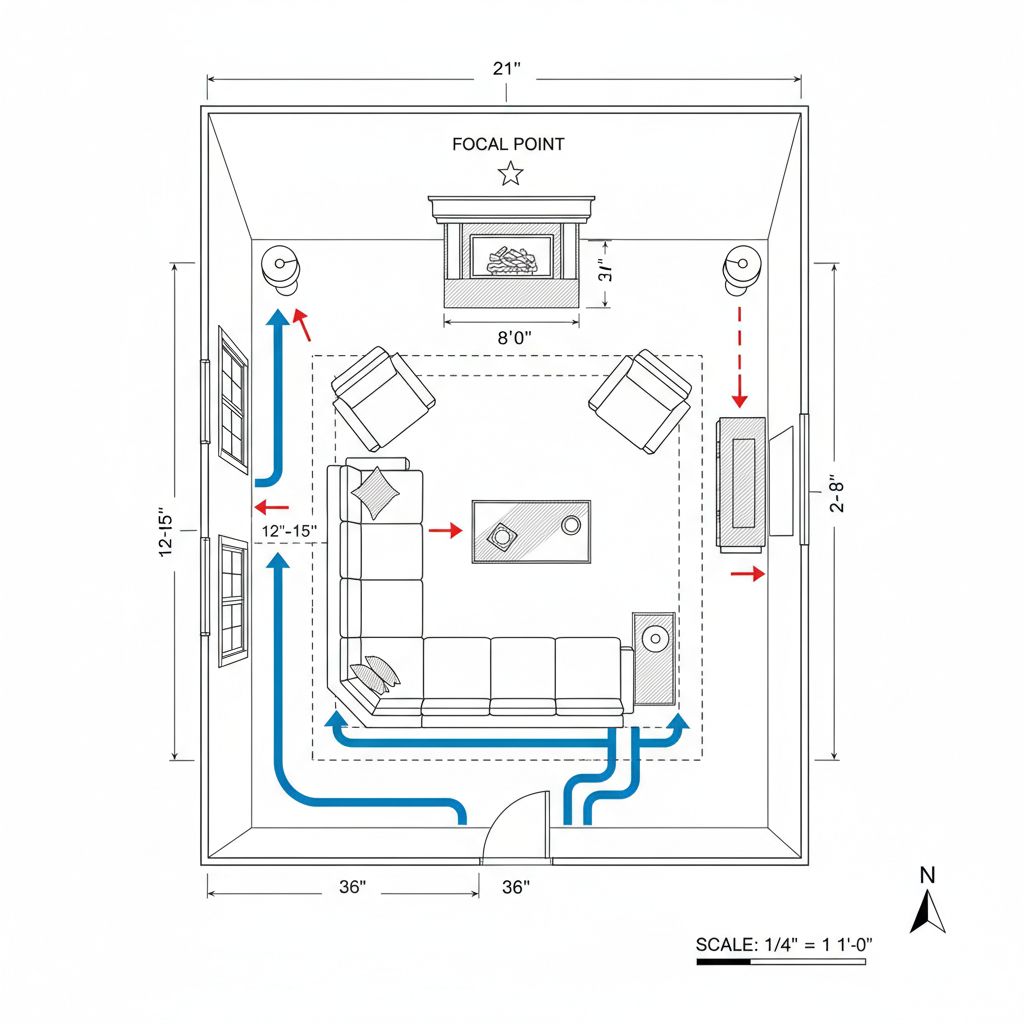
Every well-arranged room starts with identifying your focal point—whether that's a fireplace, large window, or entertainment center. This anchor guides where you'll position your main furniture pieces and creates natural visual flow throughout the space.
Balance forms the foundation of successful arrangement. You'll want to divide your room into four equal areas using imaginary balance lines, ensuring visual weight matches on opposite sides.
Traffic clearances matter more than you might think. Keep 36 inches free in front of door openings and maintain 12-15 inches of breathing room before windows.
Clear paths between major room features prevent awkward navigation. Position living room sofas away from afternoon sun to avoid uncomfortable glare during peak hours.
Dining areas require adequate space for chairs to pull back freely—nobody wants to squeeze past furniture during meals.
In bedrooms, orient your layout to catch morning light while creating distinct zones for sleeping and dressing.
When scaling furniture for floor plans, simply divide actual dimensions by your scale factor. A 4' x 4' table becomes manageable on paper while maintaining accurate proportions for your 2026 design project.
Working with Floor Plan Templates
Floor plan templates are pre-designed layouts you can customize to match your specific needs. Instead of starting from scratch, these templates give you a solid foundation that saves valuable time during your design process. You'll find templates available online or create your own using floor plan software in 2026.
Customizing templates is straightforward—add or remove walls, reposition doors and windows, and adjust the overall layout to fit your vision.
You can also incorporate furniture, fixtures, and materials to visualize your completed space.
Templates work for various projects, from home design and real estate listings to office buildings, available in both 2D and 3D formats.
The best part? You'll achieve professional-looking results even without prior design experience, making templates ideal for beginners and pros alike.
Common Floor Plan Mistakes to Avoid
Skipping proper measurements, ignoring traffic flow, and underestimating storage needs are errors that cause major headaches during construction or daily living in 2026.
Measurement and Scale Errors
Studies reveal that 21% of homeowners skip proper dimension checks when planning their floor plan layouts. This seemingly small oversight leads to costly mistakes that derail entire projects. Before you finalize anything, double-check every measurement against real-world requirements.
Your walk-in closets need a minimum 24-inch depth for proper clothes hanging.
Bathrooms require 4-5 feet of depth to function comfortably.
Kitchen layouts demand exact cabinet depth calculations to ensure appliances fit correctly.
Every door needs 36 inches of clear space in front for proper accessibility.
Scale inconsistencies create ripple effects during construction. Wrong scaling results in mismatched furniture placement and awkward room proportions throughout your home.
Watch for common door swing issues where doors collide with other doors, appliances, or cabinet faces. Verify scale consistency throughout your entire plan and check all door swing clearances before breaking ground.
Missing Important Details
Forgotten elements frustrate construction workers and homeowners alike, turning dream builds into daily annoyances. Storage space tops the list of missed features in 2026 home designs. You might end up with massive master bedroom closets while your kitchen lacks basic cleaning supply storage.
Window placement dramatically affects your natural lighting and comfort. Rooms need multiple light sources that eliminate shadows, and bathroom windows work best centered on walls rather than positioned high in showers.
Poor traffic patterns create ongoing frustration. Main entrances in direct view of living spaces remove privacy, while bathrooms placed too close to dining areas create awkward situations for guests.
Utility closets should match small walk-in sizes to actually function properly. Your kitchen design must include adequate pantry space for real-world grocery storage.
Front entrance closets need room for coats, boots, and backpacks. Position fireplaces relative to surrounding furniture and focal points, not just centered on a wall. Don't forget electrical outlet locations throughout every room.
Using Online Tools and Mobile Apps
Online tools like RoomSketcher and Canva offer user-friendly interfaces that make floor plan creation accessible to everyone in 2026. You can access your plans from anywhere, collaborate in real-time, and enjoy features perfect for both personal and professional projects.
Many platforms offer free versions or trials, letting you test features before committing. Template libraries help you get started quickly, while automatic measurement calculation ensures accuracy.
MagicPlan transforms your smartphone camera into a measuring tool, generating floor plans without extra equipment.
AutoCAD mobile bridges the gap between fieldwork and office designs seamlessly.
Cloud features enable real-time sharing through web browsers, making collaboration effortless. Multiple export format options give you flexibility for any project need.
These tools are ideal if you're an interior designer, real estate agent, or homeowner wanting professional results without extensive design experience.
Visualizing the Final Result
Before construction begins, visualization lets you experience your space digitally—saving time, money, and potential headaches. In 2026, you have powerful options ranging from simple sketches to immersive virtual reality walkthroughs.
Use 3D views for an immersive perspective that reveals issues invisible in flat 2D layouts. You can identify problems before construction starts, when changes cost nothing.
Modern software makes it easy to communicate ideas to contractors clearly and present directly from the editor to clients or architects.
Virtual reality options are now available on many platforms, letting you literally walk through your design before a single wall goes up.
Tools like Interior Design 3D offer comprehensive 3D rendering that helps you spot spatial conflicts, lighting issues, and flow problems early.
You can also save and print floor plans for future reference, keeping everyone on the same page throughout your project.
This step ensures your final space meets your needs while helping you stay within budget by catching cost-saving opportunities upfront.
Review and Finalize Your Floor Plan
The final step is conducting a thorough review to ensure your floor plan is both accurate and practical. Double-check all measurements against your actual space dimensions, and verify that doors and windows are positioned correctly.
Confirm that fixed features and furniture placements make logical sense within your layout.
Run through this verification checklist: compare exterior versus interior dimensions, verify wall thickness calculations, cross-reference all opening measurements, and check alignment of parallel walls.
If you're using digital tools, take advantage of 3D view features for a more immersive perspective. This helps you spot potential issues that aren't visible in a standard 2D layout.
Once you're satisfied with everything, save your digital files in multiple formats for flexibility. Print physical copies to keep on hand during construction or renovation projects in 2026 and beyond.
Conclusion
A clear and accurate floor plan is essential for any construction or renovation project, serving as the blueprint that ensures your vision translates to reality with precision. From measuring space to finalizing layout, each step contributes to creating functional, well-designed spaces.
Whether you're using traditional pencil-and-paper methods or digital solutions like Interior Design 3D, accuracy remains the key factor in floor plan success.
Remember to verify all details carefully—small oversights during planning can create major issues during construction.
With proper measurements, the right tools, and attention to traffic flow patterns and essential features, both beginners and professionals can confidently create professional-quality floor plans.
The ability to visualize and communicate design ideas clearly benefits homeowners, architects, real estate agents, and builders alike, making floor plan creation a valuable skill worth mastering in 2026 and beyond.